
January 25, 2022
Creating my personal website with Astro, Tailwind CSS, and Nx
It is certainly something I have been thinking about doing for quite some time, but I never really went for it until now. Several reasons have deterred me in the past from creating a personal website, and while some of them might still be valid, I decided to give it a go and create something it could push me to try to create more content and a place where I can experiment with different technology stacks.
TL;DR

You can take a look at the source code in the website’s GitHub repository .
.
Technology stack
I have been working with Angular for several years and it would have been the most comfortable choice, but I wanted to try something new and different; after all, that was one of the main reasons I decided to create my personal website.
A few months ago, I came across Astro, a modern static site builder that promises to deliver great performance by shipping zero JavaScript by default. With other interesting features like the ability to use other frameworks, on-demand partial hydration, and Markdown support, it immediately caught my attention and became my first choice.
I also wanted to use Tailwind CSS. I’ve previously played with it and I really like its flexibility and how easy and fast you can prototype and style your site. I’m not a designer and I’m not a creative person, so I particularly like the ability to quickly try things out and see how they look to find out what I like the most.
For the hosting, I decided to go with Cloudflare Pages. It has the features I was looking for and more: automatic deployments from GitHub, preview PRs, ease of use, etc. There are several other great choices out there (Netlify, Vercel, and GitHub Pages to name a few) that I’ll most likely be trying out in the future.
Last but not least, I chose to use Nx to benefit from its generation features, smart build system, and the many different features it provides. In reality, “chose” is not the right word here. I was always going to use Nx from the start. I can’t see myself not using it for any project.
Note: Though it was not necessary, I took the opportunity to create an Nx plugin called @nxtensions/astro
To summarize, this is the stack I ended up with:
- Astro: a modern static site builder.
- Tailwind CSS: a utility-first CSS framework.
- Cloudflare Pages: a JAMstack platform for frontend developers to collaborate and deploy websites.
- Nx: a next generation build system with first class monorepo support and powerful integrations.
Astro basic features
Before diving into creating the required pages and components, let’s have a quick overview of some of the basic Astro features I used to build the website.
Components
Astro comes with its own component syntax. Any file with the .astro extension represents a single Astro component and it follows the Single-File Component (SFC) pattern by containing the HTML, CSS, and JavaScript needed to render the component in the same file.
The Astro component syntax is very similar to HTML and JSX. In fact, it’s a superset of HTML and every component must include an HTML template.
Astro also has the concept of a Frontmatter component script to build dynamic components. The component script natively supports JavaScript and Typescript and it will only be processed at build time.
Pages
An Astro page is just a special type of component with additional responsibilities. While a component can return partial HTML templates, pages must return a full HTML document. Astro supports the .astro and .md files for pages, and they should be placed in the src/pages directory (or the directory specified in the configuration pages option).
Routing
Astro uses an approach called file-based routing to generate the application URLs at build time based on the pages directory structure. It supports static routes as well as dynamic routes. You can check more about this in the docs.
Creating an Nx workspace with an Astro application
Having a clearer grasp of Astro’s features, I started by creating a new empty Nx workspace by running the following command:
npx create-nx-workspace@latest leosvel-dev --preset=empty --pm=yarnNote: I specified the
--pm=yarnoption to use Yarn
Once the workspace was generated, I navigated to it and installed the @nxtensions/astro plugin:
cd leosvel-dev && yarn add -D @nxtensions/astro@latestFinally, I proceeded to generate the Astro application by running:
npx nx g @nxtensions/astro:app websiteI didn’t choose to use any renderer (to support other frameworks) because I just wanted to use Astro components.
Tip: If you use VSCode
At this point, I had a new Nx workspace with an Astro application properly configured and I was already able to start the Astro development server by running:
npx nx dev websiteVisting http://localhost:3000 in my browser displayed the landing page that was automatically generated when I created the application.
Cleaning up application files
The generated application comes with a default landing page with some content to help get started. Before moving forward, I deleted the content of the apps/website/src/pages/index.astro file and deleted the apps/website/src/components/Tour.astro and apps/website/public/styles/home.css files.
Configuring Tailwind CSS
To configure Tailwind CSS, I started by installing the required packages:
yarn add -D tailwindcss@latest postcss@latest autoprefixer@latestThen, I added the configuration for it in the project root:
// apps/website/tailwind.config.cjs
module.exports = {
  content: [
    './public/**/*.html',
    './src/**/*.{astro,md,js,jsx,svelte,ts,tsx,vue}',
    '../../libs/**/*.{astro,md,js,jsx,svelte,ts,tsx,vue}',
  ],
  theme: {},
};
// apps/website/postcss.config.cjs
module.exports = {
plugins: [require('tailwindcss')],
};Next, I proceeded to add the Tailwind CSS base styles to the existing apps/website/public/styles/global.css file:
@tailwind base;
@tailwind components;
@tailwind utilities;
Because the files in the public directory are never processed by the Astro build process, I later moved the apps/website/public/styles/global.css file out of the public directory, so it gets processed by the PostCSS plugin for Tailwind CSS. In the coming sections, I’ll cover where I placed it and how this file is referenced on the website’s pages.
Creating the common layout
The website currently has 3 types of pages: the landing page, the blog page, and the blog post page. All of them share a common layout consisting of a header, the main content, and a footer.
There’s also a 404 page, but I’m not going to cover it here since it’s very simple. It’s a page that will appear when the user tries to access a route that doesn’t exist.
Astro has a concept of Layouts. They are basically components with the specific purpose of providing a reusable page structure to reduce duplicating the same code on multiple pages.
I created a apps/website/src/layouts/BaseLayout.astro file with the following content:
---
import { Footer, Head, Header } from '@leosvel/common';

export interface Props {
  title: string;
  description: string;
  socialImage?: string;
  socialImageAlt?: string;
}

const { title: pageTitle, description, socialImage, socialImageAlt } = Astro.props;
const { canonicalURL } = Astro.request;
const siteName = canonicalURL.hostname;
const title = `${pageTitle} | ${siteName}`;
---

<html lang="en" class="scroll-smooth">
  <head>
    <Head {title} {description} {canonicalURL} {siteName} {socialImage} {socialImageAlt} />
  </head>

  <body class="min-h-screen w-screen bg-white flex flex-col font-mono text-white selection:bg-cyan-700 selection:text-white overflow-x-hidden">
    <Header currentPage={Astro.request.url.pathname} />

    <main class="flex flex-1">
      <slot />
    </main>

    <Footer />
  </body>
</html>
Alright! There’s a lot going on there. Let’s break it down to see what’s going on.
The section at the top delimited by the --- lines is the Frontmatter script for the component. That’s the place where we can import other components and write JavaScript/Typescript code that is going to be executed at build time. In this particular layout, I’m importing some components that we are going to be using, exporting the Props interface to define what props are expected, and finally, I’m getting a reference to those props from the Astro global object and some other values I need from the Astro.request object.
Outside of that section, we can write our HTML markup as well as include <style> and <script> tags. For this particular case, I’m defining the HTML content with the desired structure for the website’s pages and some basic styling using Tailwind CSS. This is where I’m making use of the imported components and I’m passing some props for them as required.
One important thing to note is the slot tag. This element allows us to render children elements passed inside the layout when consuming it.
As you can see in the code, I’m importing several components from @leosvel/common. This is a library I created in the workspace where I placed some common components used by the different website’s pages. I created the library by running:
npx nx g @nxtensions/astro:lib commonIn this library, I placed the global.css file mentioned in the previous section that contains the Tailwind CSS base styles. Also, among the components created in that library, we can find the Head component, which contains metadata, scripts, and styles for the pages. This is the component that includes the global.css file so it’s available for every page.
The following is the specific portion of code in the libs/common/src/lib/components/Head.astro file that includes the global styles:
...
<!-- Global styles -->
<style global>
  @import '../styles/global.css';
</style>
Creating the website’s pages
Now that I had the base layout ready, it was time to use it to create some pages.
Landing page
When it comes to pages, I like to keep them clean and simple and extract their presentation content into components. This is also in line with the Nx philosophy of keeping our apps light and extracting the functionality into libraries.
I created a landing library where I placed a component with the UI of the landing page. This page is quite simple right now and as it stands, it might seem too much to have a library for a single component, but creating a library is cheap and I plan to have more things in it in the near future.
This website in general is pretty simple, so it could have been done without any library at all. However, I like splitting my projects into smaller and more focused units (libraries) and I wanted to make the most of using Astro with Nx.
The following is the source code for the landing page located in apps/website/src/pages/index.astro:
---
import Layout from '../layouts/BaseLayout.astro';
import { Landing } from '@leosvel/landing';

const title = 'Home';
const description = 'My personal website with my projects and blog.';
---

<Layout {title} {description}>
  <Landing />
</Layout>
You can notice above how I made use of the layout I created in the previous section and how I’m passing the Landing component as a child to it. This causes it to be rendered in the slot tag we previously added to the layout which is placed between the Header and Footer components. The Landing component doesn’t have anything worthy of showing, it only contains the needed HTML markup and Tailwind CSS classes.
Blog page
The next page to look at is the blog page located in apps/website/src/pages/blog/index.astro. Following Astro’s file-based routing approach, this page will be available at the /blog URL.
The blog page displays a list of blog posts. These blog posts are written in Markdown files and placed in the apps/website/src/blog-posts directory. So, I needed to get the list of blog posts and display them.
Let’s have a look at the apps/website/src/pages/blog/index.astro file to see how I did it:
---
import Layout from '../../layouts/BaseLayout.astro';
import { Blog } from '@leosvel/blog';

const title = 'Blog';
const description = 'My blog with articles about web development and programming in general.';

const posts = Astro.fetchContent('../../blog-posts/*.md').sort(
  (a, b) => new Date(b.date).valueOf() - new Date(a.date).valueOf()
);
---

<Layout {title} {description} socialImage="/assets/blog-leosvel.dev.png" socialImageAlt="Leosvel's blog social image">
  <Blog {description} {posts} />
</Layout>
Like the landing page, it’s very simple and it delegates the presentation concerns to the Blog component (located in the blog library) while providing a title and the list of posts. The interesting bit is the loading of the Markdown files with the blog posts. To do that, I used the Astro.fetchContent() helper function passing a glob to those files. This function returns an array of objects containing, among other things, the Frontmatter properties specified in the Markdown files. I used the date property to sort the posts by date in descending order.
The following is the Frontmatter script section for this blog post Markdown file:
// apps/website/src/blog-posts/creating-my-personal-website-with-astro-tailwindcss-and-nx.md
---
title: 'Creating my personal website with Astro, Tailwind CSS, and Nx'
description: 'How I went about creating my personal website using Astro, Tailwind CSS, and Nx.'
date: 'January 25, 2022'
heroImage: '/assets/blog/creating-my-personal-website-with-astro-tailwindcss-and-nx/hero.png'
heroImageAlt: 'Astro, Tailwind CSS, and Nx logos'
thumbnailImage: '/assets/blog/creating-my-personal-website-with-astro-tailwindcss-and-nx/thumbnail.png'
thumbnailImageAlt: 'Astro, Tailwind CSS, and Nx logos'
---
You can see the date property that is used on the blog page to sort the blog posts.
Let’s also have a look at the source code portion of the Blog component where I use the received posts to display a list with a preview for each of them (the rest of the file is omitted for brevity):
// libs/blog/src/lib/components/Blog.astro
...
<section class="grid justify-center sm:grid-cols-2 lg:grid-cols-3 gap-8">
  {posts.map((post) => {
    const link = `/blog/${post.file.pathname.split('/').pop().split('.').shift()}`;

    return (
      <BlogPostPreview
        post={{
          title: post.title,
          description: post.description,
          date: post.date,
          link,
          thumbnailImage: post.thumbnailImage,
          thumbnailImageAlt: post.thumbnailImageAlt,
        }}
      />
    );
  })}
</section>
...
If you’ve used JSX before, this probably looks very familiar. I’m basically iterating over the posts array and creating a BlogPostPreview component for each blog post. I’m also building the link to it using the blog post Markdown file path as the URL segment. The BlogPostPreview component is a simple component that only contains the needed HTML markup and Tailwind CSS classes to display a preview of the blog post.
Blog post page
The blog post page renders the blog post content. This is a dynamic route from which many URLs will be generated (one per available blog post). In order for Astro to know what pages to generate at build time, we must provide a getStaticPaths() function. This function must return an array of objects containing the params property with any parameters that the route uses.
This particular page is located in apps/website/src/pages/blog/[slug].astro and will be available at the /blog/[slug] URL. Therefore, we need to return a slug parameter with a value matching what we want to be the URL segment for our blog posts. As shown in the previous section, I chose to use the blog post Markdown file path as the URL segment.
We can see it in action in the source code of the page:
---
import Layout from '../../layouts/BlogPostLayout.astro';
import { BlogPost } from '@leosvel/blog';

export function getStaticPaths() {
  const posts = Astro.fetchContent('../../blog-posts/*.md');

  return posts.map((post) => ({
    params: { slug: post.file.pathname.split('/').pop().split('.').shift() },
    props: { post },
  }));
}

const { Content, title, description, date, heroImage, heroImageAlt, thumbnailImage, thumbnailImageAlt } = Astro.props.post;
---

<Layout {title} {description} socialImage={thumbnailImage} socialImageAlt={thumbnailImageAlt}>
  <BlogPost {title} {date} {heroImage} {heroImageAlt}>
    <Content />
  </BlogPost>
</Layout>
As we can see above, I’m also using the Content property that is returned from the compiler when fetching Markdown files. It is a dynamically built component that contains the content of the Markdown file (the blog post in this case).
You might have noticed this page is using a different layout. It’s a clone of the base layout with an extra stylesheet for the Prisma theme used by the code blocks in the blog posts. Due to an existing issue
The BlogPost component renders and styles the blog post. Since I don’t have direct access to the generated markup for the blog post, I’m using global styles scoped to the .blog-content CSS class to ensure they are only applied to the blog post content.
// libs/blog/src/lib/BlogPost.astro
...
<article class="max-w-full sm:max-w-xl md:max-w-2xl lg:max-w-4xl mx-auto px-4 py-12 sm:px-8 md:px-12 text-sm sm:text-base text-cyan-900 leading-8 sm:leading-8 transition-all">
  ...
  <main class="blog-content">
    <slot />
  </main>
  ...
</article>

<style lang="scss" global>
  .blog-content {
    > * + * {
      @apply mt-4;
    }

    h2 {
      @apply mt-12 text-xl sm:text-2xl font-bold;
    }
    ...
  }
</style>
Improving the blog post page
With the blog post page in place, I wanted to make some improvements to it:
- Add a link to the headings when hovering them.
- Make external links to open in new tabs and add an icon to them to indicate that they are external.
But, I can’t directly modify the HTML markup of the blog post page. It’s generated by the Astro compiler when parsing the Markdown files. Fortunately, the Astro’s out-of-the-box Markdown support is very powerful and extensible. It allows you to extend the default functionality by providing Remark and/or Rehype plugins.
So to achieve my goals, I configured the rehype-slug and rehype-autolink-headings plugins to generate links to the headings in the blog post. I also configured the rehype-external-links plugin to add the target="_blank" and rel="nofollow noopener noreferrer" attributes to external links, as well as adding an icon to them.
Below is the configuration in the apps/website/astro.config.mjs file to enable those plugins:
export default /** @type {import('astro').AstroUserConfig} */ ({
  ...
  markdownOptions: {
    render: [
      '@astrojs/markdown-remark',
      {
        rehypePlugins: [
          'rehype-slug',
          [
            'rehype-autolink-headings',
            {
              behavior: 'prepend',
              content: {
                type: 'element',
                tagName: 'span',
                properties: { className: ['heading-link'] },
                children: [
                  {
                    type: 'element',
                    tagName: 'img',
                    properties: { src: '/assets/link.svg' },
                    children: [],
                  },
                ],
              },
            },
          ],
          [
            'rehype-external-links',
            {
              content: {
                type: 'element',
                tagName: 'img',
                properties: {
                  src: '/assets/external-link.svg',
                  alt: 'External link icon',
                },
                children: [],
              },
              contentProperties: { className: ['external-link-icon'] },
            },
          ],
        ],
      },
    ],
  },
});
Final workspace structure
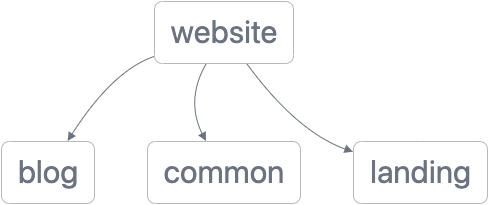
One of the benefits of using Nx is that you can easily visualize your workspace projects and their dependencies. By running the following command:
npx nx dep-graphI got the following visualization of my website’s projects:
Deploying to Cloudflare
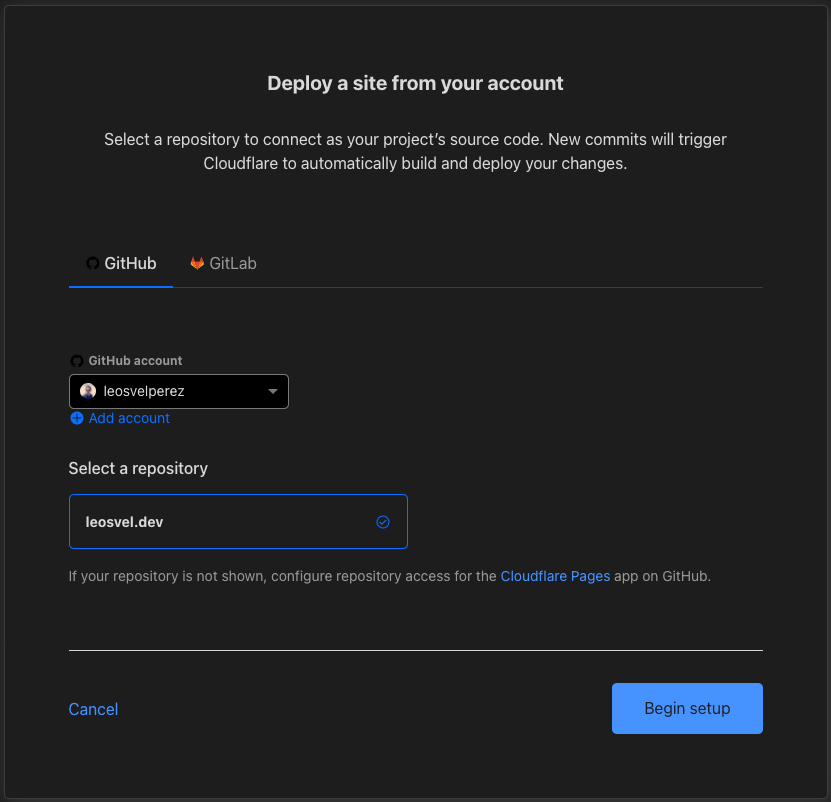
Setting up automatic deployments to Cloudflare Pages from the GitHub repository was really easy. To do so, I did the following steps:
- Accessed the
Pagespage in my Cloudflare dashboard - Clicked on the
Create a projectbutton - Added my GitHub account, selected the repository to deploy, and clicked on the
Begin setupbutton:
- Updated the build settings with:
- Project name:
leosvel-dev - Production branch:
main - Framework preset:
None - Build command:
nx build website - Build output directory:
dist/apps/website - Added the
NODE_VERSIONenvironment variable and set it to16.13.2so the build command runs with it
- Project name:
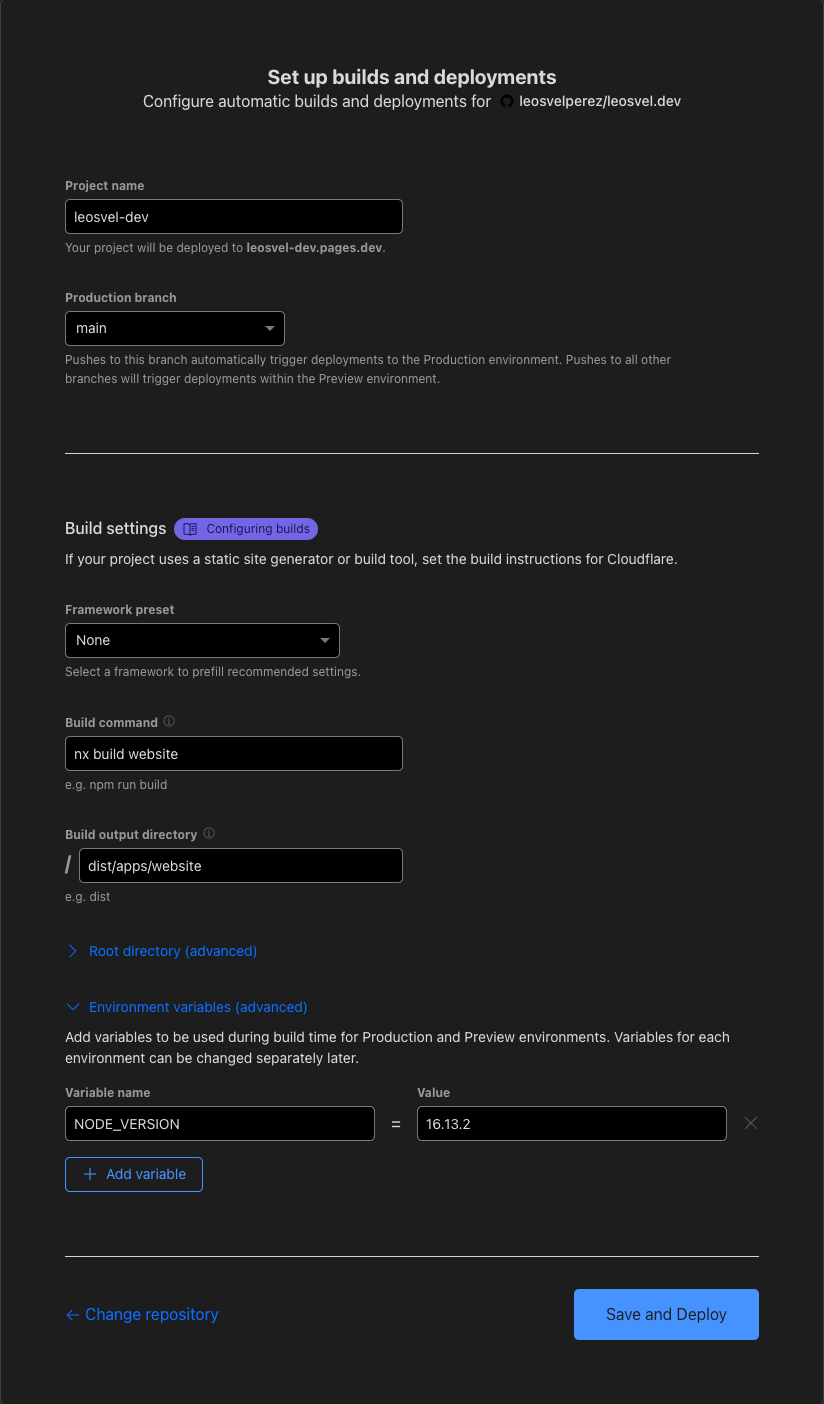
- Clicked on the
Save and deploybutton
The build was immediately kicked off and the website was deployed to Cloudflare Pages in just a couple of minutes. By default, it was available on a subdomain of the pages.dev domain. To have it with my own domain, I had to set it up and I did it by following the steps below:
- On the
leosvel-devproject page, I clicked on theCustom domainstab - Clicked on the
Set up a custom domainbutton - Entered my domain name and clicked on the
Continuebutton - I was shown a confirmation page with the new DNS record for my domain and I clicked on the
Activate domainbutton
That was it! The website was live and available on my domain.
Setting up Cloudflare Web Analytics
Cloudflare Web Analytics provides, in their own words, free, privacy-first analytics for your website. It allows you to track how your website is being used and how it is performing.
To enable it, I just had to add my website to it. This is done on the Web Analytics page of the Cloudflare dashboard. By default, Cloudflare injects the analytics script in the website pages, but since I wanted to use Partytown to move third-party scripts execution off of the main thread, I disabled the automatic setup.
I installed @builder.io/partytown:
yarn add -D @builder.io/partytownThen, I added it to the Head component alongside the Cloudflare Web Analytics script with its type set to text/partytown. That type attribute with that value prevents browsers from executing the script and it provides a selector for Partytown to query for and do its magic.
Below is the code snippet for this:
// libs/common/src/lib/components/Head.astro
---
import { Partytown } from '@builder.io/partytown/react';
...
---
...
<!-- Partytown -->
<Partytown />

<!-- Cloudflare Web Analytics -->
<script type="text/partytown" defer src='https://static.cloudflareinsights.com/beacon.min.js' data-cf-beacon='{"token": "30e7f4a2b20548998ad672795c296f1c"}'></script>
...
One extra thing I needed to set up was to copy the required Partytown library files from the @builder.io/partytown package to the built application. This is necessary because those files are required to be served for Partytown to work correctly.
I made this change by renaming the existing build target in the website project configuration (apps/website/project.json) to build-astro and create a new target called build where I run the build-astro target and a small script I created to copy the relevant files:
{
  ...
  "targets": {
    "build-astro": {
      "outputs": ["dist/apps/website"],
      "executor": "@nxtensions/astro:build",
      "options": {}
    },
    "build": {
      "executor": "@nrwl/workspace:run-commands",
      "outputs": ["dist/apps/website"],
      "options": {
        "commands": [
          "nx run website:build-astro",
          "node ./tools/scripts/copy-partytown-files-to-dist.js"
        ],
        "parallel": false
      }
    },
    ...
  },
  ...
}
Performance
With everything in place and the website up and running, it was time to get some performance insights. Running Lighthouse on the live website for mobile gave me the following results:
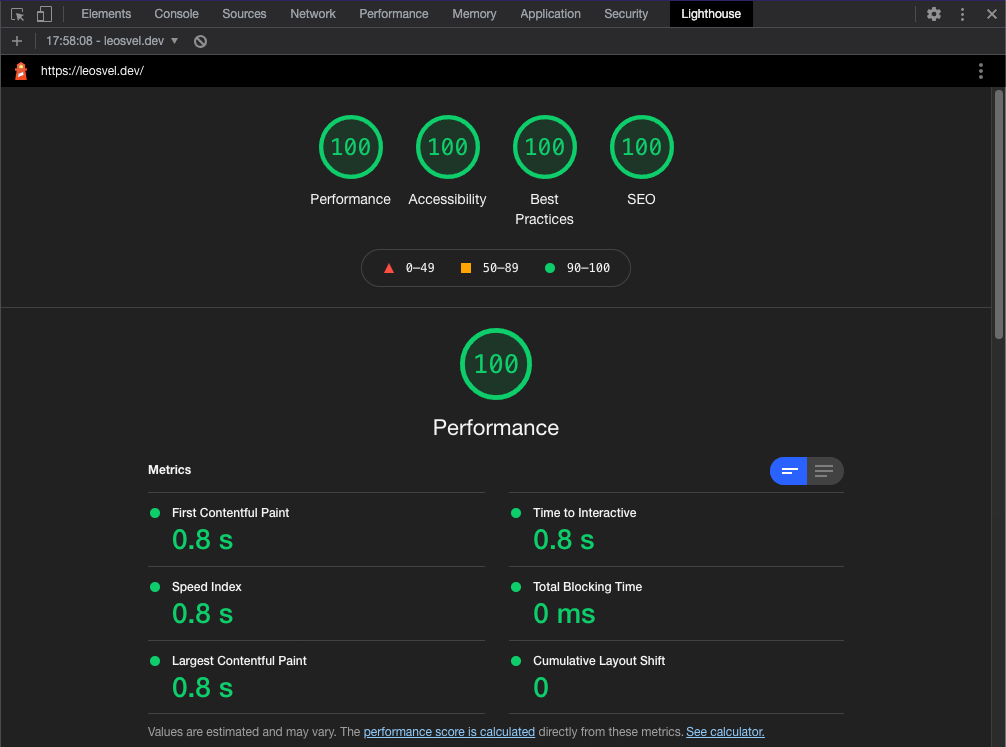
Now, that’s a good-looking report! Isn’t it?
Final thoughts
Building my website was a really fun experience. I enjoyed the process and the fact that I took the chance to experiment with new technologies.
I’m really glad I chose Astro to build the website. Even though it still hasn’t reached a stable release, it already works reasonably well and delivers on its promise of achieving great performance. The fact that it’s not stable yet and still works this well excites me the more, it’s only going to get better!
I achieved the goals I initially had in mind, creating a personal space where I can experiment with new technologies and blog about them and other topics.
It’s this the end of the journey? Hell no!
This is just the beginning. I plan to add a couple more pages to the website, continue to improve its design, add more features to the blog, refactor some bits to clean up the code, and from time to time, I might rewrite or build multiple versions of it with different stacks (I’m looking at you Remix and Qwik).
Stay tuned! Happy coding!